Introduction
Keeping your airbrush clean is very important if you want it to function every time you need it, or even to extend its lifespan, thus protecting your investment. Below we present a guide on how you can maintain your airbrush; here we are using a Harder & Steenbeck (H&S) airbrush with MrHobby lacquer paint, however, the tips provided here are applicable to any brand of airbrush or type of paint used in it.
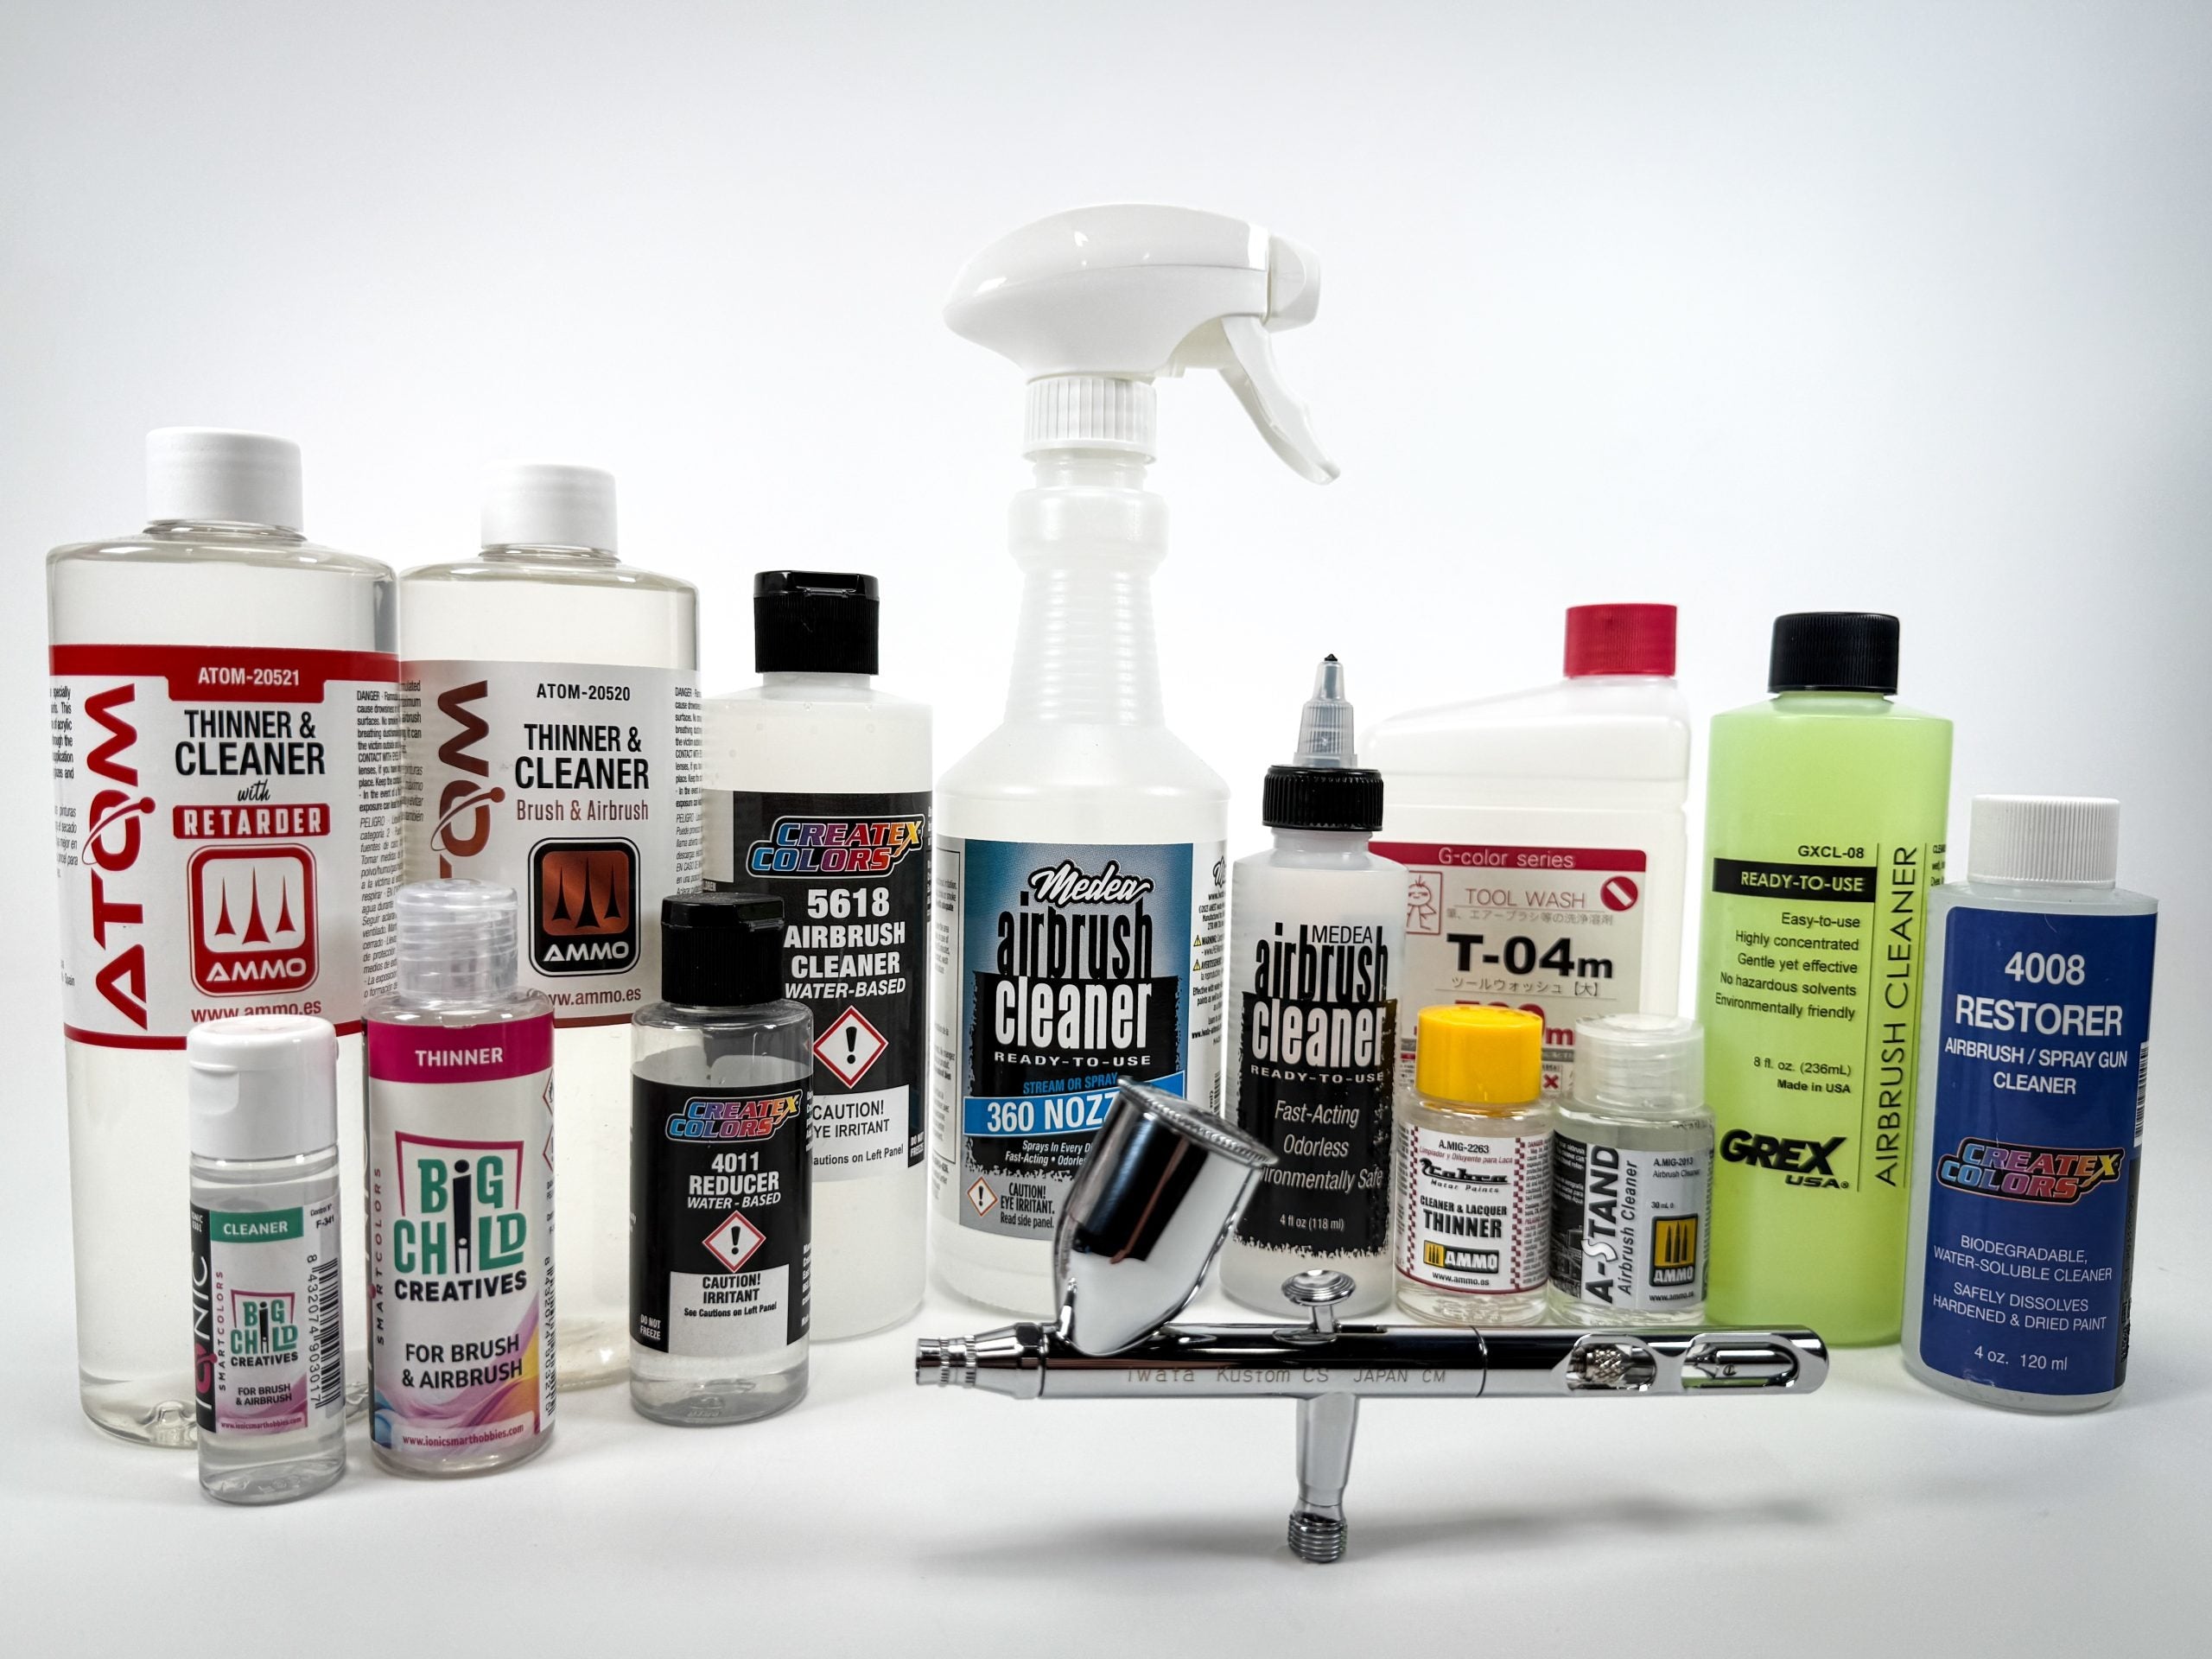
Before you start with the guide, you should remember that to properly clean your airbrush after each use, you need to use the appropriate solvent or one that effectively dilutes the paint you just used (for example, preferably use water to clean acrylic paints or lacquer thinner for lacquers, it is also extremely recommended that you use airbrush cleaners like Iwata Medea Cleaner or Createx reducer 4011, these are excellent products of proven and certified quality and effectiveness.). Follow these steps to achieve a complete and professional cleaning.
Step 1: Preparation and Safety
After finishing using your airbrush, you should always avoid storing it with paint residue if you don’t want to damage your painting tool, which likely cost you a lot of money. To protect your investment and continue achieving good results when painting, you must always clean your airbrush.
First, you need to have on hand the tools you will use in the cleaning process. Here are the most basic recommendations for this process:
Gather the necessary tools:
Commercial airbrush solvents or cleaners like those from Iwara or Createx (in this example, we use lacquer thinner; but if you use another type of paint, use the solvent most suitable for that particular type of paint).
Small brushes and/or cotton swabs.
An old brush, but with enough bristles left.
A clean, lint-free cloth.
Containers for the solvent and for collecting residue.
An air compressor to help expel the paint.
Personal Protective Equipment (PPE):
Gloves and mask to protect you from vapors, especially if you are using strong solvents.
Make sure to work in a well-ventilated area.
Objective: Prepare the work area and have the implements and conditions that also help protect your health during the cleaning process.
Step 2: Initial Cleaning Without Disassembly
To make the airbrush cleaning process easier, it’s best to focus first on removing as much paint as possible from the airbrush before considering disassembling it. Cleaning as much as possible before disassembly makes the subsequent work easier.
Removal of Excess Paint:
The process begins by removing the excess paint that will not be used; for this, you can pour the excess into a container for airbrush cleaning.

Then, place a few drops of the appropriate solvent to more easily remove the remaining paint stuck to the walls of the paint cup (as we indicated previously, we recommend that you use for this, Iwata Medea Cleaner or the reducer for 4011 Createx). In this case, you can first use a disposable cloth to wipe away the paint residue from the walls of the cup, and then a cotton swab for the narrower parts of the cup (the part that is close to the needle).


To finish, add a few more drops of the sisolvent that you have been using into the cup of paint and gently rub the lower parts of the paint compartment and the nozzle of the airbrush with the brush.

Expelling Diluted Paint:
Reconnect your airbrush to the compressor and turn it on, using compressed air to expel the excess diluted paint through the nozzle. This step helps to “soften” the dry or stuck paint inside.
You can discharge the paint residue into the same waste paint container used previously. If you do not have a container for disposing of paint, you can discharge the paint residue or thinner onto a rag or cloth designated for that purpose.
Optional: at this step, you can cover the air outlet of the airbrush with your fingers so that it returns to the loading chamber. This action allows the thinner to “recirculate” inside the airbrush’s internal nozzle, helping to release more paint that you could not reach in the previous steps, thus facilitating the following processes.

General External Cleaning:
With a cloth dampened in solvent, carefully clean the external surfaces of the airbrush to remove any superficial residue.

With these simple steps, your airbrush will regain its flawless exterior appearance just like when it was new; however, it still needs to be cleaned internally.
Objective: To perform an initial cleaning to remove most of the residual paint, preparing the airbrush for a more detailed internal cleaning.
Step 3: Disassembly and Deep Cleaning of Internal Components.
Disassembly:
Once the initial cleaning is done and most of the paint has been removed, carefully disassemble the removable parts (nozzle, needle, paint reservoir, etc.).

Consult the manufacturer’s manual to ensure you do not damage any parts. In our example, the magnificent Harder & Steenbeck Infinity CR Plus airbrush only requires disassembling a few parts that we need to clean. It could be disassembled more completely for a thorough inspection of its components, but to clean it and ensure it works properly, it is advisable to only disassemble the needle, the nozzles, and the cup. In this case, the system used by Harder & Steenbeck to integrate the nozzle into the device in this airbrush makes disassembly easier, as it simply needs to be placed and does not require screwing.
In other airbrushes, disassembling the nozzle may require you to have other specialized tools available to unscrew it.


Deep Cleaning:
With a small brush and cotton swabs moistened with solvent, clean the internal channels and hard-to-reach areas, such as the inside of the nozzle and the needle channel.


At this point, you can place the smaller pieces inside the container with thinner, or the commercial solvent of the paint that you used in the airbrush, or simply use some specific solution to clean airbrushes such as Iwata Medea Cleaner or Createx reducer 4011, this, so that the remains of paint in those small parts are diluted more easily.
NOTE: To preserve the integrity of the o-rings, it is recommended that you do not extend this step unnecessarily.

You can clean each small piece using a fine brush..

Gently wipe the needle with a cloth or rag moistened with thinner until you remove the paint residues.

Objective: To ensure a thorough cleaning of the internal areas that were not completely cleaned in the first step.
Step 4: Reassembly.
Reassemble the airbrush following the correct order, making sure that each piece fits properly to ensure optimal performance.

Objective: Ensure that the airbrush is completely assembled for its next use.
Step 5: Regular Maintenance and Additional Tips.
Basic Post-Use Cleaning:
Perform a quick cleaning after each working session to avoid the buildup of residue and facilitate periodic deep cleaning.
Periodic Inspection:
Regularly inspect the condition of the airbrush parts, and if necessary, replace defective parts with original spare parts purchased from a trusted airbrush supply distributor.
Process Adaptability:
Remember that if you work with different types of paint, you should change the solvent according to the recommendations of each manufacturer. We recommend that you use Iwata Medea Cleaner or Createx 4011 reducer to always get the best results.
Some users choose to use carburettor cleaning fluid as a thinner in the cleaning process, this is really effective (I have personally tested it) in dissolving virtually any paint, the cleaning is really deep, but keep in mind its strong smell and the need to work in well ventilated areas with adequate protection, therefore you could use this as an emergency option or to complement the pre-cleaning process at the end.
Objective: Keep the airbrush in optimal condition and ensure consistent results with each use.

Guía Paso a Paso para Limpiar tu Aerógrafo de Forma Efectiva
Introducción
Mantener tu aerografo limpio es muy importante si quieres que este funcional cada vez que lo necesites o incluso, para extender su vida útil, y por tanto, proteger tu inversión. A continuación te presentamos una guia de cómo puedes hacer mantenimiento a tu aerografo, aca estamos empleando un aerógrafo H&S (Harder & Steenbeck) con pintura tipo laca de MrHobby, sin embargo, los consejos que aca te suministramos son aplicables a cualquier marca de aerografo o tipo de pintura usada en él.
Antes de comenzar con la guia, debes recordar que para limpiar adecuadamente tu aerografo después de cada uso, debes usar el disolvente apropiado o que efectivamente diluya la pintura que acabas de usar (por ejemplo, preferiblemente usa agua para limpiar pinturas acrilicas acrílicas o thinner tipo laca para lacas, tambien es extremadamente recomendable que uses limpiadores de aerografo como el de Iwata Medea Cleaner o el reductor 4011 de Createx, estas, son excelentes productos de una calidad y efectividad más que comprobada y certificada.). Sigue estos pasos para que puedas obtener una limpieza completa y profesional.
Paso 1: Preparación y Seguridad
Después de terminar de usar tu aerografo, siempre debes evitar guardarlo con restos de pintura si no quieres estropear tu herramienta de pintura, la cual, probablemente te ha costado mucho dinero, para proteger tu inversión, y seguir obteniendo buenos resultados al pintar debes limpiar tu aerografo siempre.
Lo primero es que debes tener a mano las herramientas que emplearas en el proceso de limpieza, aca te recomendamos los más básicos para este proceso:
Reúne las herramientas necesarias:
Solventes o limpiadores de aerografo comerciales como los de Iwara o Createx (en este ejemplo usamos thinner tipo laca; pero si usas otro tipo de pintura, emplea el solvente más adecuado para ese tipo de pintura en particular).
Cepillos pequeños y/o hisopos de algodón.
Pincel viejo pero con suficientes cerdas aún.
Paño limpio y sin pelusa.
Recipientes para el solvente y para recoger restos.
Compresor de aire para ayudar a expulsar la pintura.
Equipo de protección personal (EPP):
Guantes y mascarilla para protegerte de vapores, especialmente si usas solventes fuertes.
Asegúrate de trabajar en un área bien ventilada.
Objetivo: Preparar el área de trabajo y contar con los implementos y condiciones que también ayuden a proteger tu salud en el proceso de limpieza.
Paso 2: Limpieza Inicial sin Desmontar
Para facilitar el proceso de limpieza del aerografo, lo ideal es que primero te concentres en eliminar la mayor cantidad de pintura del aerografo antes de pensar en desmontarlo. Limpiar lo más posible antes de desmontar facilita el trabajo posterior.
Eliminación del Exceso de Pintura:
El proceso comienza eliminando el exceso de pintura que no se usará, puedes para esto, descargar el exceso en un recipiente para limpieza de aerógrafos.
Luego, coloca unas pocas gotas del disolvente apropiado para poder asi lograr eliminar más fácilmente los restos de pintura adheridos a las paredes de la copa de pintura (como te indicamos anteriormente, te recomendamos que uses para esto, Iwata Medea Cleaner o el reducer para 4011 Createx), en este caso, puedes emplear primero un paño desechable para eliminar los restos de la pintura de las paredes de la copa y luego un hisopo de algodón para las partes más estrechas de la copa (la parte que está cerca de la aguja).
Para terminar, pon unas gotas adicionales del diluyente que has estado usando en la copa de la pintura y con el pincel, frota suavemente las partes más bajas del compartimiento de carga y la boquilla del aerografo.
Expulsión de la Pintura Diluidas:
Conecta nuevamente tu aerografo al compresor y enciéndelo, emplea aire comprimido para expulsar el exceso de pintura diluida a través de la boquilla. Este paso ayuda a “ablandar” la pintura seca o pegada en el interior.
Puedes descargar los restos de pintura en el mismo recipiente para la pintura de desecho usado anteriormente. Si no tienes un recipiente para desechar la pintura puedes descargar los restos de pintura o diluyente en un trapo o paño destinado para tal fin.
Opcional: en este paso, puedes con tus dedos tapar la salida de aire de aerografo para que este se regrese a el compartimiento de carga, esta acción hace que el diluyente “recircule” dentro de la boquilla interna del aerografo, ayudando a que se desprenda más pintura que no pudiste alcanzar en los pasos anteriores, y asi se facilitan los procesos que siguen.
Limpieza Externa General:
Con un paño humedecido en el disolvente que estas usando, limpia cuidadosamente las superficies externas del aerógrafo para remover cualquier residuo superficial.
Con estos sencillos pasos tu aerografo recuperara el aspecto externo impecable tal como cuando era nuevo, sin embargo aún falta limpiar su interior.
Objetivo: Realizar una primera limpieza para eliminar la mayor parte de la pintura residual, preparando el aerógrafo para una limpieza interna más detallada.
Paso 3: Desmontaje y Limpieza Profunda de Componentes Internos
Desmontaje:
Una vez realizada la limpieza inicial y removido la mayor parte de la pintura, desmonta cuidadosamente las partes removibles (boquilla, aguja, depósito de pintura, etc.)
Consulta el manual del fabricante para asegurarte de no dañar ninguna pieza. En nuestro ejemplo, el magnífico aerografo Harder & Steenbeck infinity CR plus solo requiere desmontar unas pocas piezas que son las que requerimos limpiar. Pudiera desmontarse de manera más completa, para una revisión a fondo del estado de sus partes, pero para limpiarlo y que funcione adecuadamente es recomendable que solo desmontes la aguja, las boquillas y la copa. En este caso, el sistema empleado por Harder & Steenbeck para integrar su boquilla al aparato en este aerografo, facilita el desmontaje ya que solo se coloca y no es necesario enroscarlo.
En otros aerógrafos, desmontar la boquilla podría requerir que tengas a disposición otras herramientas especializadas para poder desenroscarla.
Limpieza Profunda:
Con un cepillo pequeño e hisopos de algodón humedecidos en el disolvente que estas usando, limpia los canales internos y las partes difíciles de alcanzar, como el interior de la boquilla y el canal de la aguja.
En este punto, puedes colocar las piezas más pequeñas dentro del recipiente con thinner, o el disolvente comercial de la pintura que usaste en el aerografo, o simplemente emplea alguna solución específica para limpiar aerógrafos como el Iwata Medea Cleaner o el reductor 4011 de Createx, esto, para que se diluya más fácilmente los restos de pintura en esas pequeñas partes
NOTA: Para preservar la integridad de los o-rings es recomendable que esta paso no lo extiendas innecesariamente.
Cada pieza pequeña puedes limpiarla empleando un cepillo fino.
Frota suavemente la aguja con un paño o trapo humedecido en el thinner o disolvente que estes empleando hasta que elimines los restos de pintura.
Objetivo: Asegurar una limpieza minuciosa de las áreas internas que no fueron completamente limpiadas en el primer paso.
Paso 4: Reensamblaje
Vuelve a montar el aerógrafo siguiendo el orden correcto, asegurándote de que cada pieza encaje correctamente para garantizar un funcionamiento óptimo.
Objetivo: Garantizar que el aerógrafo esté completamente ensamblado para su próximo uso.
Paso 5: Mantenimiento Regular y Consejos Adicionales
Limpieza Básica Post-Uso:
Realiza una limpieza rápida después de cada sesión de trabajo para evitar la acumulación de residuos y facilitar la limpieza profunda periódica.
Revisión Periódica:
Inspecciona regularmente el estado de las piezas del aerógrafo, y si fuera necesario, sustituye las piezas defectuosas por repuestos originales adquiridos de un distribuidor de insumos para tu aerografo de confianza.
Adaptabilidad del Proceso:
Recuerda que, si trabajas con diferentes tipos de pintura, deberás cambiar el solvente según las recomendaciones de cada fabricante. Recomendamos para que obtengas siempre un mejor resultado, uses los limpiadores para aerografo Iwata Medea Cleaner o el reductor 4011 de Createx
Algunos usuarios optan por utilizar líquido para limpiar carburadores como diluyente en el proceso de limpieza, este es realmente eficaz (lo he probado personalmente) para disolver prácticamente cualquier pintura, la limpieza es realmente profunda, pero ten en cuenta su fuerte olor y la necesidad de trabajar en áreas bien ventiladas y con protección adecuada, por lo tanto podrías usar esto como opción de emergencia o para complementar al final el proceso de limpiado previo.
Objetivo: Mantener el aerógrafo en óptimas condiciones y asegurar resultados consistentes en cada uso.

Share:
What is The Best Compressor for Airbrush?
Start Airbrush: Platform for Beginners to Kick-off Their Airbrush Journey